The BEST & Worst of 2012

2012 was a year of extremes.  One of those years where its so tough you can’t wait to move on, stash it away and forget about it, yet there were so many good things mixed in you feel guilty wishing it away.

BEST of 2012:

  1. Sold our house in NC.  Nearly 5 years of ownership and only 10 months use, the monkey is off my back.
  2. 5 years later – still in love – in Italy.  Memories of a lifetime.
  3. Finding the job and co-workers who make me happy.  In my younger days I admittedly took things for granted but I see very clearly now.
  4. Family is everything.  Family time is much more relaxing when you don’t live 6 hours away.
  5. Finally, a house that is a home.  We’ve lived in 6 places in 5 years.  I’m grateful to hang pictures, paint walls, and invest myself emotionally in a home.

Worst of 2012:

  1. Best friends are hard to come by.  Lots of change this past year – I feel like there’s a hole in my heart.
  2. Leaving Atlanta. “Georgia on My Mind” by Ray Charles hits me in the gut every time.
  3. Job stress.  Sometimes you can’t see the good until you’ve experienced the bad.

2012 Lessons Learned:

  1. You have to be a friend to make a friend.
  2. It’s easier to love than hold a grudge.
  3. You can always count on family.
  4. Finding the right job is more important than finding a job.
  5. Life is short.
  6. Never get on a ladder wearing flip flops.
  7. When people want to help, let them.

2013 Resolutions:

  1. Commit my resources to Southland’s Richmond Road campus.
  2. Get to know my neighbors.
  3. Finish a project before I start a new one.
  4. Learn when to BUY versus DIY.
  5. Focus on JOY.

All in all, I have been looking forward to 2013 for a while but it hasn’t been all bad – it’s nice to reflect the good of this year.  So…..

Cheers to the new year

and another chance to get it right!

Happy New Year!

Aimee

Epic FALL turns epic FAIL.

Tags

,

After 28 years.

Countless ignored warnings to “be careful”

Climbing, jumping, tumbling, running, and falling…

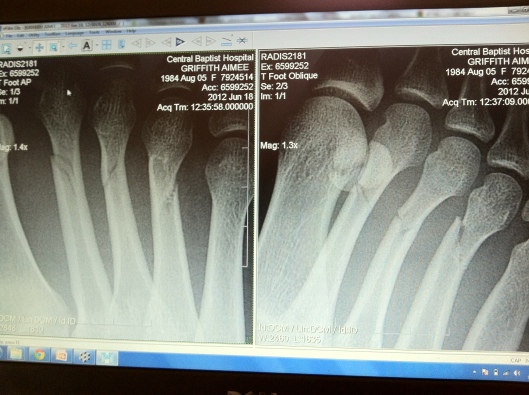
One fall too much.  I broke my foot in 3 places.  Eek.

broken foot

You don’t have to be a radiologist to find these 3 breaks.

I fell from a ladder and before I could think, I was on the ground.  My first thought was, “Wow, I landed pretty good.”  I was most worries about my back and my hands.  Taking quick inventory of any injuries, I realized I had definitely hurt my foot.  I didn’t even try to walk on it.  I hopped on one foot inside to get Mark.

I knew something was wrong but I was hoping it was just a sprain so I waited it out instead of going to urgent care or the ER.  Plus, if it was just a sprain I would be really upset with a hefty ER bill.  I wasn’t bleeding and I wasn’t dying!  So I waited.  Besides the hopping on one foot and crawling up my stairs (probably a hilarious sight), I wasn’t in too much pain.

Finally Monday I saw a doc.  She pushed and poked.  I cried.  I kinda wanted to kick her it hurt so bad.  I bet Mark I broke 2 bones. He bet on the under.  I won.

I was handed a CD of my x-rays and sent home, no news yet.  I was prepared to have no idea what I was looking at on the x-rays but instantly I saw the culprit staring back at me.  I couldn’t spin it or hide from it, it was obvious from first glance I had 3 breaks.  Grrrrr……

I’ve spent the last few weeks gutting our attic, building a table, bench, planters, fixing gutters, starting a garden, staining our deck, etc.  The list goes on and none of which involved sitting.  Yet now I find myself….sitting on my couch.  I am miserable.  You never realize how much you take for granted until you’re put in a situation where something is taken away from you.

broken foot in cast

Do me a favor today…go for a little walk, will you?  I certainly wish I could enjoy this beautiful warm weather!

DIY Kitchen Island Renovation

Tags

, , , , , , ,

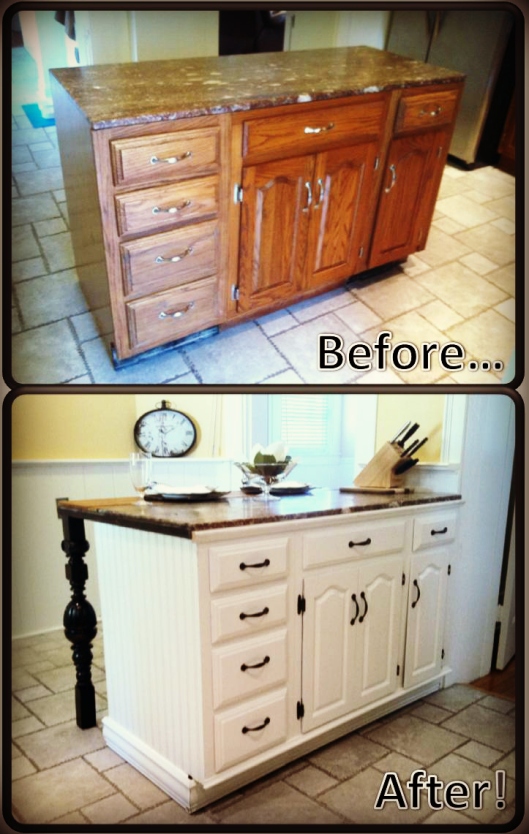
DIY kitchen island renovation

Our kitchen came with a kitchen island pushed against the wall.  After a few weeks of cooking, I realized it was an opportunity.  I wanted to push it out in the center of the room as a real island to give me more food prep space and create seating for guests that linger in the kitchen.

When I pulled it out, I realized it was completely unfinished.  The bottom had rubber trim, the back was open and the marble top piece was unsecured.

DIY kitchen island renovation

After finding inspiring ideas online, I pulled my resources and started working!

First step – remove doors and drawers and add casters. The marble makes this piece really heavy to move.  I wanted the flexibility of moving it, if needed.  I added 6 casters beneath the piece, 2 that locked for stability.

hide kitchen island casters

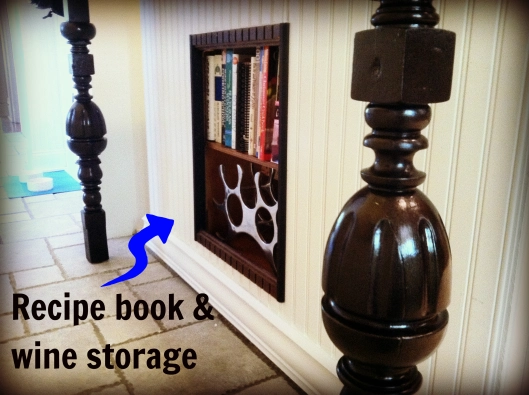
Step 2 – bead board.  This was the only purchase I made for the renovation.  I added some plywood to the back to level a plane for bead board.  I also decided to shape the back opening a bit and utilize it for open storage. A little liquid nails, a level and a nail gun and it was a quick process.

DIY kitchen island renovation

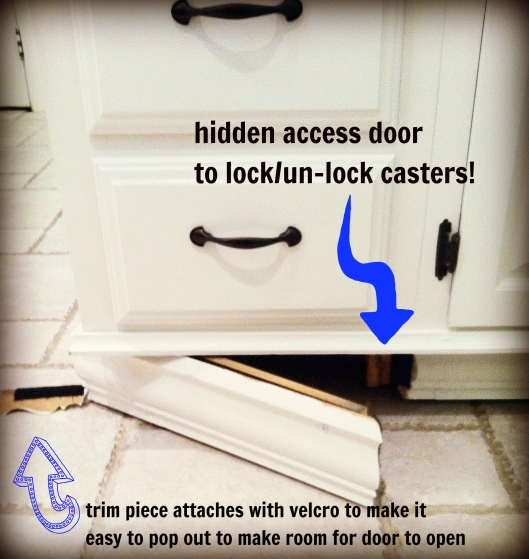
Step 3 – add trim and frame back opening.  This was the hardest part for me.  The trim was salvaged from our garage attic but needed a little love.  I had to scrape off old paint and sand it smooth first.  I was excited to use my miter saw for the edges but it was a big learning opportunity because it’s hard to get the length just right.  I also cut a built in door in the trim so I could easily access the hidden 2 casters to lock/unlock.

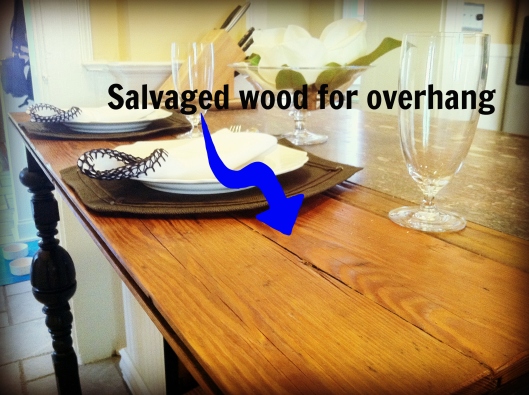
Step 4 – add overhang and supports.  The marble piece wasn’t big enough to cover the island anyhow and I wanted to add an overhang for seating.  I salvaged old wood from our attic floors, cleaned, sanded, cut and finished with amber shellac and danish oil I had on hand.  I also added some 1 x 2 wood on the top to support the overhang.

diy kitchen island renovation

Step 5 – secure top with trim.  I finally found a couple of pieces to use to hold the top pieces in place and hide the crack where they meet.  Cut and screwed in.

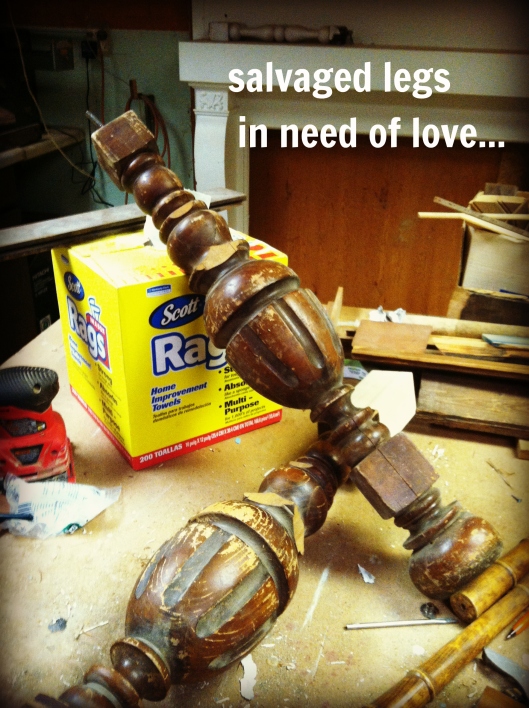
Step 6 – kitchen island legs.  I loved these salvage legs I found in the attic but they were in really bad condition and not the right height.  I bought a poplar post from the hardware store and cut pieces for the top and bottom for a good fit.  Then putty the cracks and paint: black acrylic paint (2 coats), a little oil rubbed bronze spray paint, and 2 coats of polyurethane. Then, screw them into trim and support.

re-purposed wood legs for kitchen island

Step 7 – paint cabinet and hardware.  I decided to spray paint the hardware oil rubbed bronze to match other accents in the house.  First, I primed it, then added 2 coats of paint, and a protective finish.  I didn’t want it to chip off easy.  I painted the cabinets with leftover paint from the house trim – oil based for a nice seal and easy clean up.

how to easily spray paint hardware

Hm….am I missing anything?  I’m sure I am.

The easiest part? Bead board.

The hardest part? Finding the right pieces of salvage wood and cleaning it up.

Biggest thing I learned?  How to measure and miter trim.  It’s a LOT harder than it looks!  Just a 1/4 inch off and you’ve got a problem.

I was super excited about the finished product.  Now I need a couple of awesome bar stools and maybe a little more trim work and it’s complete.  Yay!

After seeing the finished product, I think Mark is ready for me to re-paint the rest of our cabinets….funny how that happens 🙂

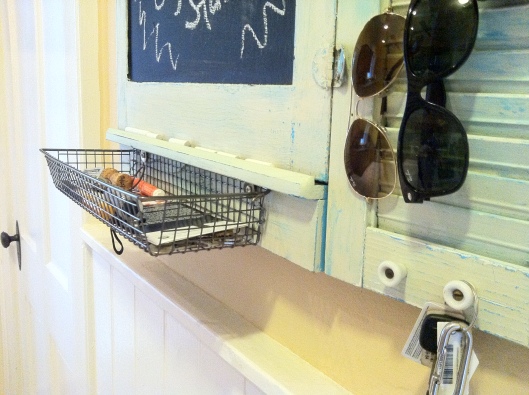
DIY Chalkboard Entry Organizer from re-purposed cabinet door & shutter

Tags

, , , , ,

When we bought our house, we also inherited a lot of random wood and building materials.  At first we thought it would be a burden, but we quickly learned that old wood is really awesome if you know how to use it!

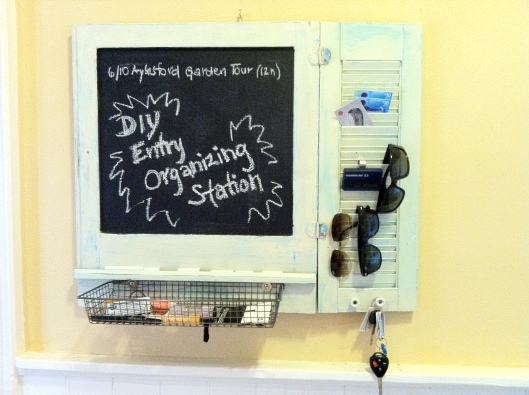
I really wanted a place for everything for our entry.  I was tired of small piles of “stuff” littering the kitchen entry.  I just wanted everything to have it’s own place – making things easier to find and more organized.

How to entry storage

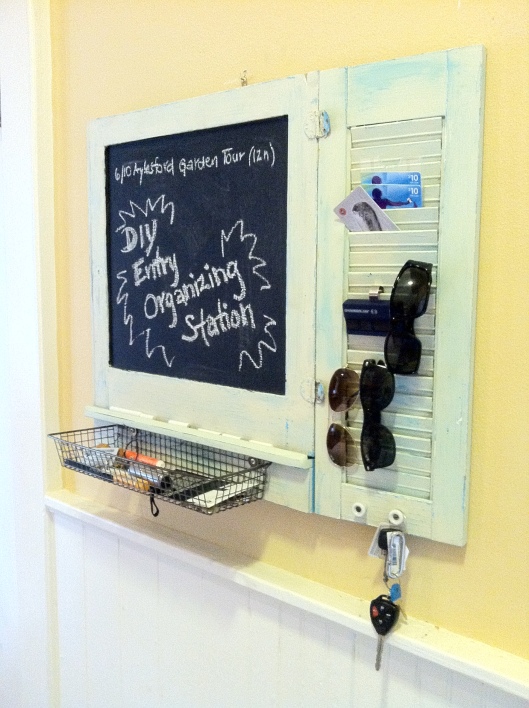
It wasn’t super easy at first.  The shutter and the cabinet door wasn’t the same height so I had to add a piece of wood and make a lip for the chalk.  I also had a hard time with the metal basket – it took me a while to find the right piece and I had to cut and reconfigure it a bit to make it sit right.

organizing system has just the right amount of room for the everyday items you need most

I painted the shutter and door blue, then a couple coats of white and a little sandpaper revealed the blue with a pretty distressed look.

I love it!  I really would like to duplicate the look for my pantry closet with cork board or a magnet board so I can keep track of upcoming events and invites.  To come…one thing at a time!

DIY Planter for My Baby Dwarf Lemon Tree

Tags

, , , , , , ,

Ever since I visited Seville, Spain and walked streets where every tree was a lemon, lime or orange tree, I’ve always wanted my own.  Our Atlanta condo wasn’t setup for gardening, so with a new home, workshop and patio it’s time to get started!

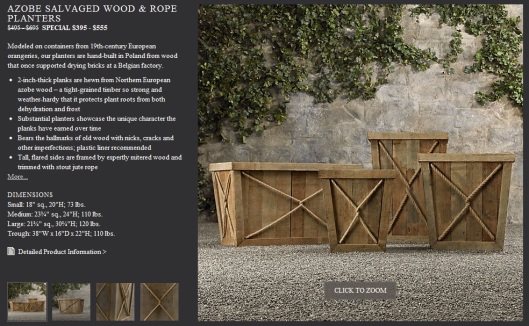
I saw these beautiful planters at Restoration Hardware and decided to take up the task myself.

My Inspiration For DIY Planters

$395 on sale? No, thank you.

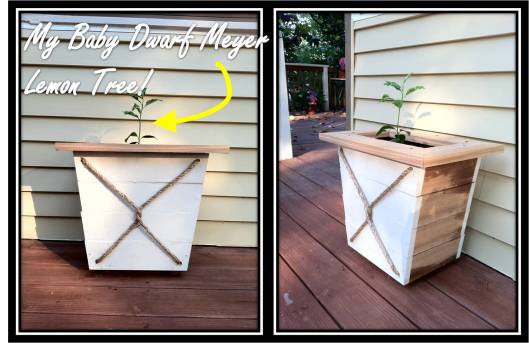
A little cedar wood, a little white wood and some rope.  Yay!

DIY Planter Box

Granted, I could have finished it in all cedar but I was impatient and had the white wood on hand, so…

What do you think?

Hopefully I’ll have a beautiful indoor/outdoor dwarf meyer lemon tree, like this one!

Buried Treasures: Hidden Brick Paved Walkway

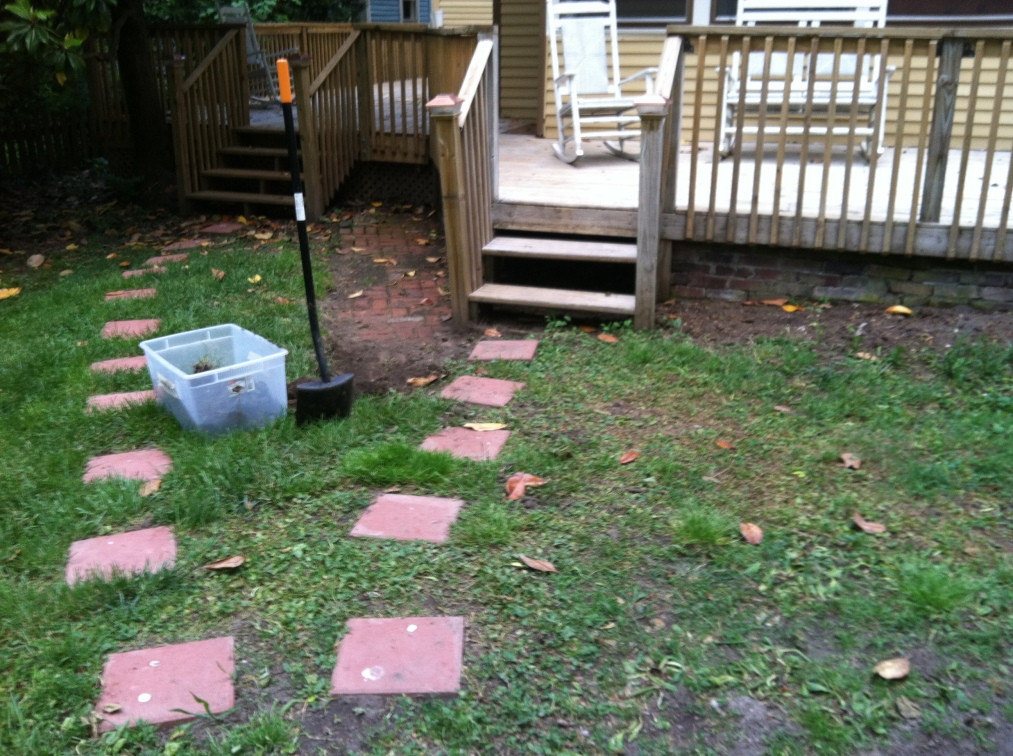
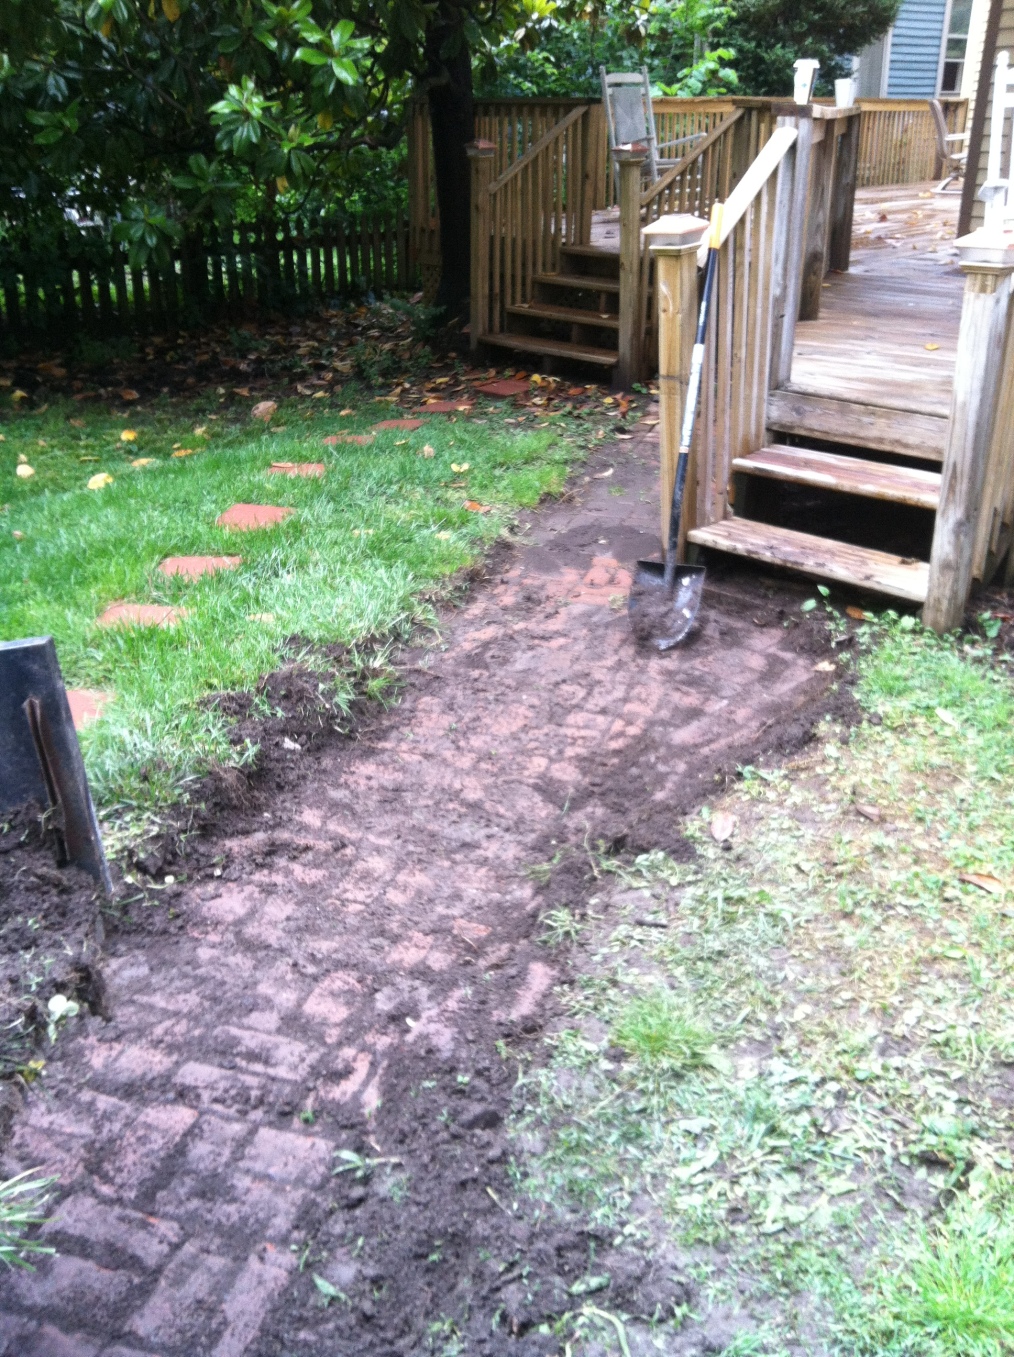
Mark and I stumbled upon this little discovery while pressure washing and didn’t believe it until my dad confirmed – yup, those are bricks about 4” below the ground.  I started digging.

Image

Here is the yard when I just got started digging

And I soon realized the small tupperware wasn’t going to suffice all the dirt I was hauling away…

Image

You can see the path now – almost there!


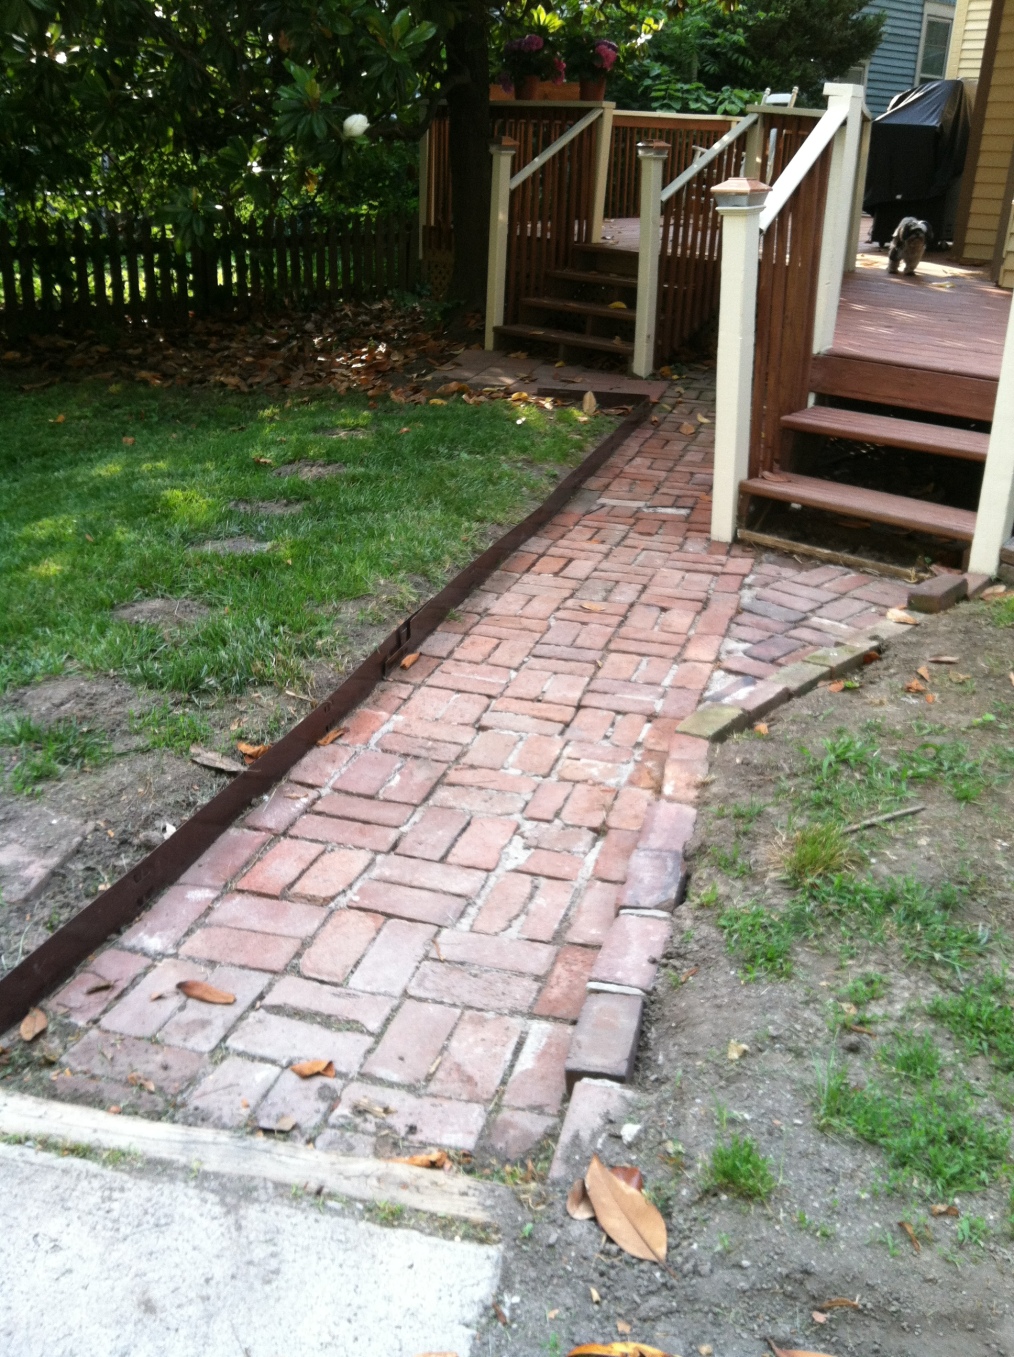
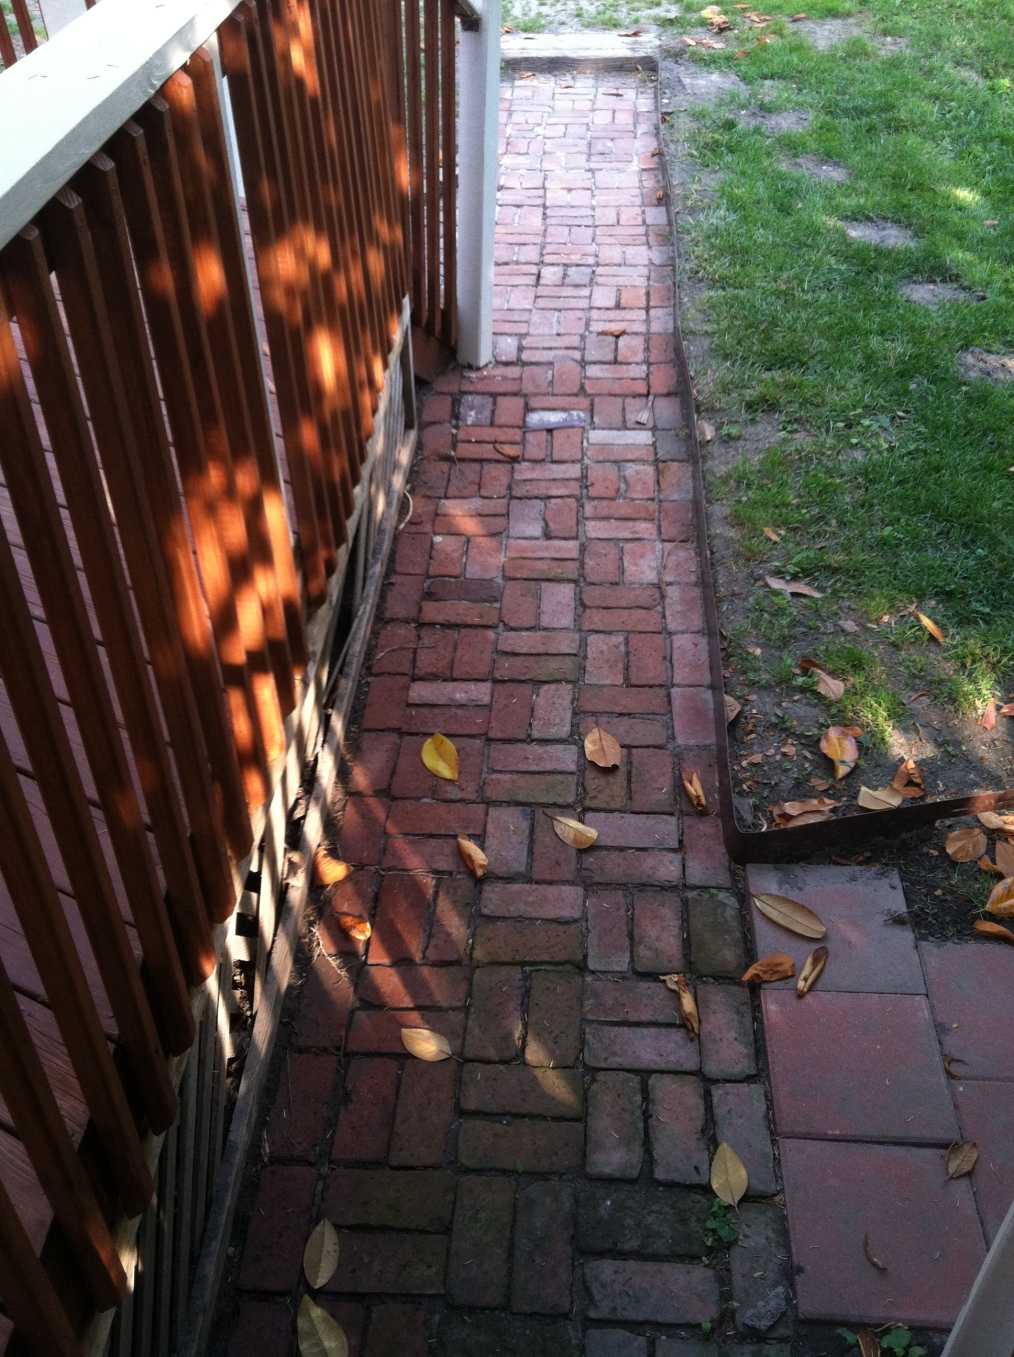
And now, finally finished!

Image

Image

I added edging to keep the dirt off one side but otherwise I didn’t do anything to the bricks themselves.  Aren’t they lovely?  Who would hide such beautiful bricks??

Lesson learned – dirt is heavy.  I’ll never try to move that much dirt at once again.  My cart fell over several times and when I was finished and wanted to move it, it wouldn’t budge! Ha!

Sneak Peak: DIY Toy Box

Tags

, , , , , , , , ,

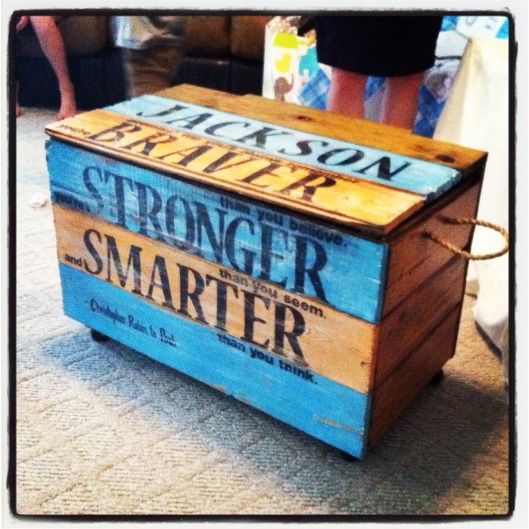
It started as a sign for my new nephew, Jackson, then became a toy box and here is a sneak peak…

do-it-yourself personalized wood toy box

Those who know me know I am super sentimental and sometimes get carried away with ideas. I’m really proud of how my first big diy wood project turned out!  More details to come.

First time home buyer: lessons learned

When Mark and I bought out first house, we never thought it would end up such a disaster.  When you’re going through the process for the first time, you’re sooo excited about all the things that come with your first “home” together.  You have hopes of having kids there, what you’ll do to fix it up, how it will all come together.  We never planned to move 10 months after we bought the house.  So many “would-a” “could-a” “should-a”….but what good does that do?

This house unfortunately ended up being a disaster. You heard me rant about it here and here.

Mistake #1: We bought a house before carefully considering the location.  I would recommend anyone moving to a new location to do their research first and spend enough time in that area to know it’s the right place.  Location is everything with a house. Whether you want nice, friendly neighbors or restaurants within walking distance, you spend more time in your home than anywhere else.

Mistake #2: We tried to predict the future.  Yes, you hope you will love it and stay there forever, but you never know what tomorrow will bring and you will be surprised how many things take higher priority than your house. 5 years? Probable.  20 years?  Doubtful you can plan that far in advance.

Mistake #3: We didn’t plan for the worst case scenario.  Going into the biggest purchase of your life, it’s crucial to have that conversation – what if?  We were newlyweds looking to make a nest anywhere we could find.  We were ignoring the 800 lb. gorilla in the room.  Chances were high we would eventually move, if we had been taken our blinders off. What would you do if one of you lost your job? What would you do if one of you were offerred an amazing job in another location? Big questions you have to ask.  I know because we didn’t.

Mistake #4: We didn’t have a support system.  Don’t be fools (we were). House upkeep is HUGE.  You want to fix things, change things, renovate things.  It’s a lot harder to take care your first house on your own.  We didn’t have great friends of family around to call for a hand.  Never underestimate the value of having family to rush over and help when something goes array.

Mistake #5: Assume renovations are easy.  When buying our first house, we looked at very “surface” changes we wanted to make, but what you don’t realize is A) how expensive it is, and B) it might seem simple at first glance, but sometimes you can’t make changes you want.  Figure out whether the changes are feasible and how important they are to your re-sale value before you offer.

We bought our first home 1/1/2008.  We moved out 10/2008.  We just sold it last week.  We have learned the most valuable lessons through this absolutely stressful, annoying and expensive experience.  Life isn’t a fairy tale.  I like to look on the bright side of life, but even I ran out of possible positives in this situation.  It was like a roller coaster of emotions: optimism, denial, anger, sadness, desperation…. *sigh*

The day we were to close on our new house in Lexington, literally minutes before I left to go to closing, we got an offer on our house.  Tears literally filled my eyes. We took it.  At this point, we had accepted this house wasn’t going to have a fairy tale ending.  It was all business at this point – cut our losses and move on.  I had so many emotions.  I wanted to cry, laugh, scream, break something, cheer.  My emotions at that moment were overwhelming.

I can’t tell you how wonderful it feels to not have to worry about renting our house, shudder when the tenants called to tell us that a contractor had fallen through our roof, that the fridge went out, that there was a leak.  Not to have to worry about winterizing our house, getting a letter from the HOA that our grass was too high, paying utilities (money you never get back), dealing with negative feedback after negative feedback from showings and now being able to change it.  Paying taxes on a house you don’t live in.  Dreading every time someone asked about our “NC house” and trying not to yell at them because I don’t know!  What do you want me to tell you?  It stinks. We can’t sell it. I hate that house, I wish we had never bought it and I don’t want to talk about it.  Instead, you manage as best as you can.

Finally, it is done.

I’m a grocery snob.

Tags

, , , , ,

There….I said it.

Do I feel better?  Not really.

I’ve lived in Lexington since December, been to probably 5 or 6 different groceries (Meyer, WalMart, multiple Krogers, Target….you name it!) and I still can’t find the right one for me.

Seems like such a silly thing to fuss over, right?  Well, like I said.  I’m a grocery snob.

I’m the grocery patron who picks up 7 heads of garlic before I find the right one.  I know exactly what I’m looking for.  I’ve tested different brands and have my favorites.  I only like to buy antibiotic and steroid free poultry and grass fed beef. I bring my own grocery bags.

It’s ok – I know what you’re thinking and I totally embrace it.  OCD? Maybe.

I lived in Atlanta long enough for it to be our home and made the most amazing discovery: The Dekalb Farmer’s Market.

Most people associate a farmer’s market with an outdoor, once-a-week thing.  This wasn’t like that at all.  It was situated a 20 minute drive from downtown, in a large open warehouse and full to the brim with every type of produce you can imagine exists.

What I drooled over:

  • Produce told you where it was from (Mexico? CA? Georgia? You knew!)
  • Prices varied based on supply – sometimes organic was cheaper than the alternative
  • All poultry was antibiotic and steroid free and from $0.99/lb!
  • They had grass fed beef…for $5.99/lb!
  • All the pastries and granola was made on-site and from organic ingredients
  • The price were unreal.  Literally.

I would come home with bags and bags of produce that would last a full week of meals and spend $60

It was HEAVEN.

Between the move, the holidays, the new job….I’ve fallen off my healthy wagon and hardly cook anymore.  I even forgot a very important chili ingredient! CHILI!  C’mon, that’s the easiest thing in the book.

Now that we’re settled in the new digs and I’ve got all of my cooking tools back at my finder tips, I’m jumping back in.

So here’s my plan: I’m starting an organic garden.  Herbs, tomatoes, cucumbers, squash, jalapeños, potatoes? – maybe.   It’s on.  Which brings me to my next goal…

I’m learning how to compost.

I’m turning over a new leaf.  Let’s see how this goes!